iCloud Syncing - Mac Older Version
This guide will walk you through the steps of setting up the iCloud sync feature in mSecure. First, there are two settings you will need to make sure are setup correctly on each device. These two settings are the email associated with your iCloud account and the iCloud Drive setting. Then we will go through the process of syncing your data with your iCloud account using mSecure on a Mac computer. Let’s get started.
Setting up iCloud syncing
First, a few notes:
Due to Apple’s security policies, only the Mac App Store and iOS version of mSecure are able to use iCloud syncing
iCloud sync won’t work between different iCloud accounts because Apple doesn’t allow sharing of files between iCloud accounts.

System Preferences
First, open your computer’s System Preferences and click on the iCloud icon.

Make Sure iCloud Drive is Enabled
In the iCloud settings window, make sure that iCloud Drive is selected. Please also make sure to verify the username and email address being used. The email address must be the same on your other Apple devices if you plan on using iCloud syncing in mSecure on those devices.

Sync Preferences
After verifying the iCloud Drive is enabled, open mSecure, click on mSecure > Preferences in the top left of your screen (command+comma). Click on the “Cloud Sync” tab, then click on the drop down element just underneath the tabs in the preferences window.

Sync with iCloud
After clicking on the drop down, you will see three options. Select the “Sync with iCloud” option.

Set New Cloud Sync Password
If this is the first device on which you are setting up the iCloud sync feature, you will be prompted to create a new cloud sync password, which will be explained shortly. If you have already set up the iCloud sync feature on another device, then you should already have a cloud sync password, and you can move on to the next step named, “Set Existing Cloud Sync Password”.
Two passwords are necessary when you are syncing your data via iCloud. There is the login password that you use to login to mSecure, and this password is used to encrypt and decrypt your data stored locally on the device. There is also a cloud sync password that is used to encrypt and decrypt the data in the mSecure sync file stored in your iCloud Drive. Each device running mSecure must be using the same cloud sync password in order to be authorized to sync in the information stored in that sync file.
The reason there is a cloud sync password as well as the login password is because some customers wish to have a very strong password protecting their data stored in their cloud account. They want to be able to set a very long and random password to encrypt the information stored in the sync file in their iCloud account, and this password would be extremely difficult for them to enter into mSecure every time they open the app. With the two different passwords, they can have a strong, but more memorable, password to login to mSecure multiple times a day, and they can also have an extremely strong password protecting the information stored in their iCloud Drive.
Though the cloud sync password can be different than your login password, it can also be the same. If you happen to be using the iCloud sync feature for more of a backup type feature, then we recommend using your login password during this step, because if you forget your cloud sync password, the data stored in your iCloud account will be lost. Since there is no way to access the encrypted data stored in your iCloud account if the cloud sync password is forgotten, we do not recommend using iCloud syncing as your only method of backing up your mSecure information.
Go ahead and set your cloud sync password, then click on the “Set” button to continue.

Set Existing Cloud Sync Password
If you have already set up the iCloud sync feature in mSecure on another device, then you will be prompted to set the cloud sync password that you created in your other mSecure app. If you don’t know your existing cloud sync password, and if you are using the iOS version of mSecure, you can use the iCloud Syncing for iOS guide.

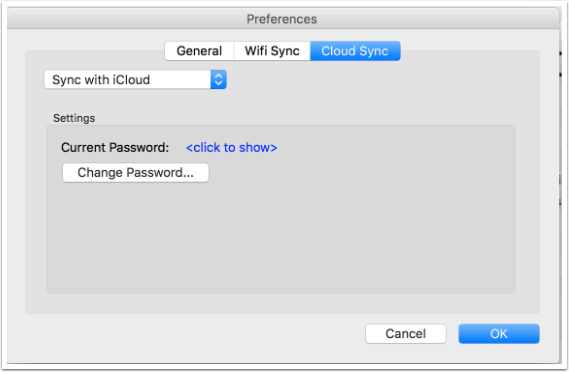
Cloud Sync Preferences after Completing the Sync Setup
After you have set your cloud sync password, you will be taken back to the Cloud Sync settings in mSecure’s Preferences window. Now you will see the “Change Password” button, and the “Auto-sync” setting. If you would like to change your cloud sync password, you can do so by clicking the “Change Password” button. By default, after you set up the iCloud sync feature, the “Auto-sync” option will be turned on. To turn that off at any time, you can open these settings, then uncheck the “Auto-sync” checkbox.
Your cloud sync password is also displayed in this screen. To reveal the password, you can click on the <click to show> link. Should you ever need to retrive your cloud sync password, you can do so by opening mSecure’s preferences, and click on the “Cloud Sync” tab.
Go ahead and click on the “OK” button to accept any changes and dismiss the “Preferences” window in mSecure.
Active Sync Button in the Main View
Once the sync setup is complete, the sync button in the main view of mSecure will now be active. This button can be used to perform a manual sync of your data. Since the addition of the “Auto-Sync” feature, this button is rarely used because a sync is always triggered within 30 seconds of the last change you made to your data. Any time you add, edit or delete a group, type or record, the auto-sync feature will be triggered.
One possible use for the sync button is if you make a quick change to your database, but you need to close the app very quickly. At this time, mSecure for Mac and Windows is not able to perform a sync when it is closed, so some of our customers perform a manual sync before closing the app after making a change to their data.

Did you find it helpful? Yes No